eLearning is changing the way people learn. Creating an eLearning website lets you share knowledge, reach more students, and build a profitable business.
But launching a successful eLearning platform isn’t just about putting up courses. You need the right strategy, tools, and setup to create a smooth learning experience.
In this guide, we will walk you through from choosing a business model and setting up your site to creating courses, and keeping things running.
Let’s dive right in!
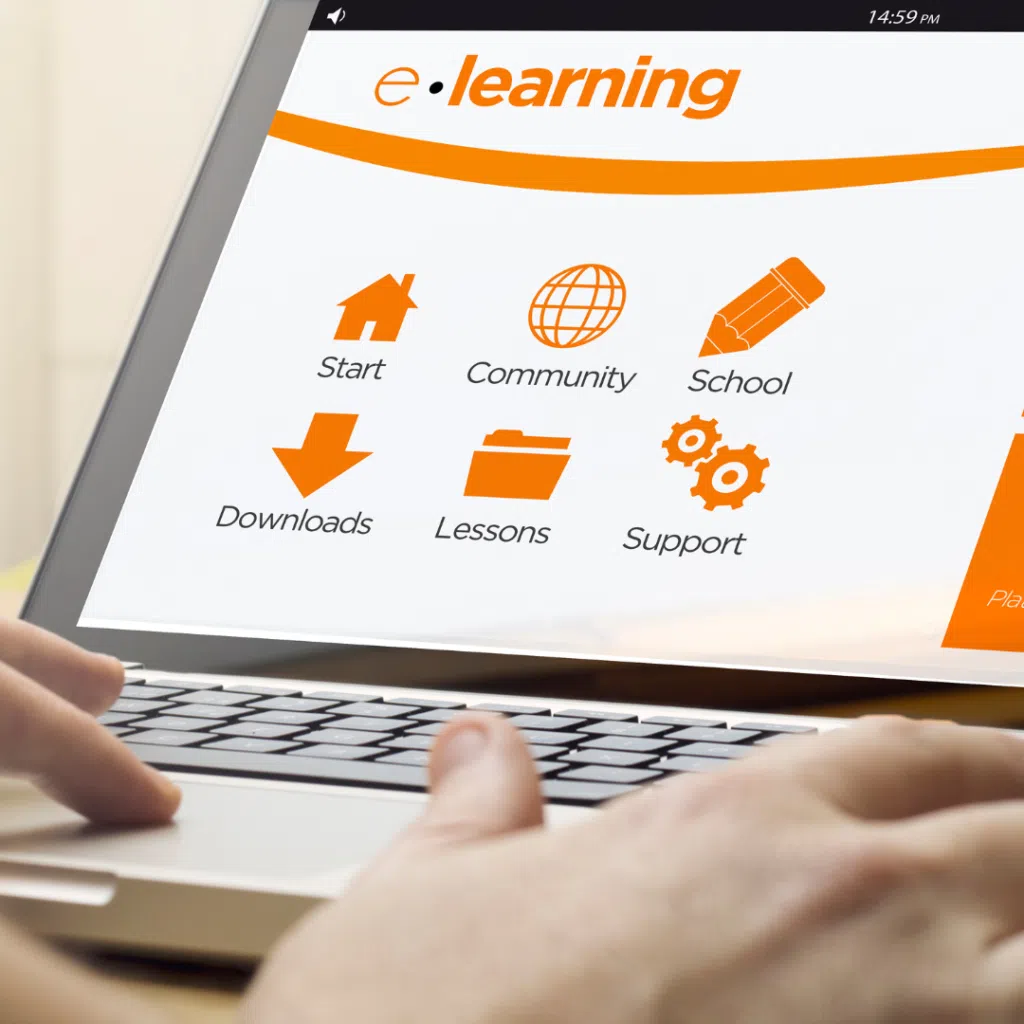
What Is an e-Learning Website?
An e-Learning website is a digital classroom that delivers education online. It hosts courses, lessons, quizzes, and assignments in one place.
Now, here’s what you need to know. A great e-Learning site makes learning simple and engaging. It guides users smoothly from registration to course completion. It should be intuitive and easy to navigate. This means clear menus, responsive design, and accessible content.
But wait, there’s more!
An ideal e-Learning website actively engages learners. It offers interactive elements like quizzes and discussion forums. It tracks progress and gives instant feedback. This keeps students motivated and on track.
Here’s the scoop on what a quality e-Learning website does:
User-Friendly Interface: Simple design that anyone can use.
Interactive Content: Videos, quizzes, and assignments that keep learners involved.
Performance Tracking: Tools to monitor progress and award certificates.
Mobile Optimization: Access anytime, anywhere.
If you’re wondering how to create elearning site that ranks and converts, start here. Combine a robust Learning Management System (LMS) with thoughtful design and user support. That’s the foundation of any successful e-Learning website.
In short, It transforms education into an engaging journey. Doesn’t matter if you’re building a site to teach a skill or run a full-scale online academy, focus on clear, simple, and interactive design.
How to build an eLearning website
Let’s dive into the 5 steps of creating an eLearning website.
1. Study Your Target Audience and Choose a Business Model
Before you create your elearning site, get clear on who you’re serving. Know your audience inside out.
Ask:
Who are they?
What skills do they want?
What challenges do they face?
This research helps you build content that speaks directly to them.
Now, picture the student journey. Imagine a clear, step-by-step learning path from registration and course discovery to active learning and certification. This journey shapes your site’s design and features.
Once you know your audience, pick a business model that fits their needs and yours.
Here’s what you need to know:
Subscription Model: Users pay a recurring fee. It works well for on-demand courses. This model keeps revenue steady.
One-Time Payment: Charge per course. Ideal if your courses offer a complete learning journey.
Marketplace Model: Allow multiple instructors to sell courses. You earn through commissions.
Pick a model that matches your audience’s expectations and spending habits. This decision not only affects revenue but also shapes content delivery, user engagement, and overall growth.
2. Buy a Domain
Choose a short, memorable name that reflects your brand and niche. Use trusted registrars like Namecheap or Hostinger.
Here’s what you need to do:
Keep it Simple and Memorable. Pick something short, easy to spell, and relevant to elearning.
Check Availability and Protect Your Brand. Before you commit, use domain registrars to check if your desired name is available. If it is, grab common variants and different extensions (.com, .net, .org) to protect your brand.
Consider Future Growth. Pick a domain that will grow with your business. Avoid names tied too tightly to one course or subject.
Act Fast. Great domains don’t last long. Once you find the right one, buy it immediately.
4. UI/UX Design Creation
Now it’s time to design how your elearning site looks and feels. You need a clean, intuitive interface that guides users effortlessly.
Here’s what to do:
Keep It Simple. Design with clarity. Avoid clutter. Clear navigation helps students find courses fast.
Focus on User Experience. Map out the student journey. Think about every click and page. Make sure each step is smooth and engaging.
Brand Consistency. Your design should echo your brand. Use consistent colors, fonts, and imagery to build trust.
Responsive Design. Ensure your site looks great on all devices. Mobile optimization is a must in today’s digital world.
Test and Improve. Gather user feedback. Make small tweaks that enhance usability.
Need help polishing your design? If you’re looking for expert UI/UX support, contact Pixels Digital. We can help craft a user-friendly design that makes students journey to purchase a course smooth.
4. Set Up Your eLearning Website
By using WordPress, we get the added advantage of a huge library of plugins available that can accomplish anything you need, from building your website to managing your video library. Furthermore, WordPress is user-friendly, requiring little to no tech knowledge.
Here are some of the best plugins, themes and video players for an eLearning site when using WordPress:
Plugins
TutorLMS: The core engine for your elearning site. It helps you create courses, lessons, quizzes, and assignments with ease.
Edubin: A theme built for education. It offers a clean design and easy navigation, ideal for elearning.
Astra: Lightweight and flexible. It’s perfect for fast-loading pages and a responsive user experience.
Video Players
VooPlayer: A customizable video player designed for secure and branded video delivery.
YouTube: A reliable, free option. Easily embed videos to engage your learners without extra costs.
5. Create Your Online Courses: Step-by-Step (2025 Updated)
Creating an engaging online course with TutorLMS is straightforward. Follow these detailed steps to build your course effectively.
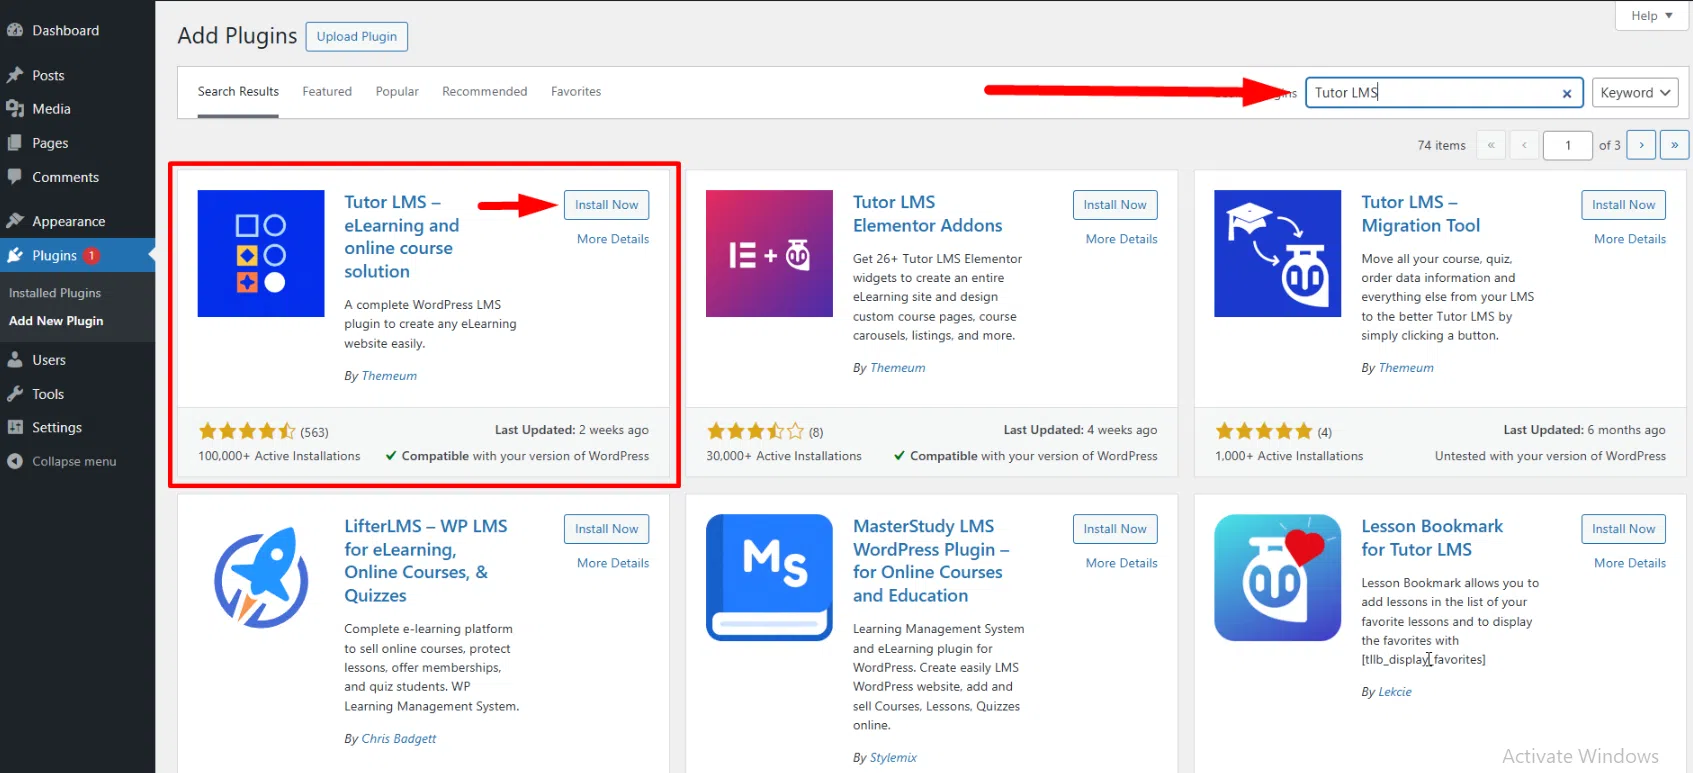
Step 1: Install and Activate TutorLMS
Install TutorLMS:
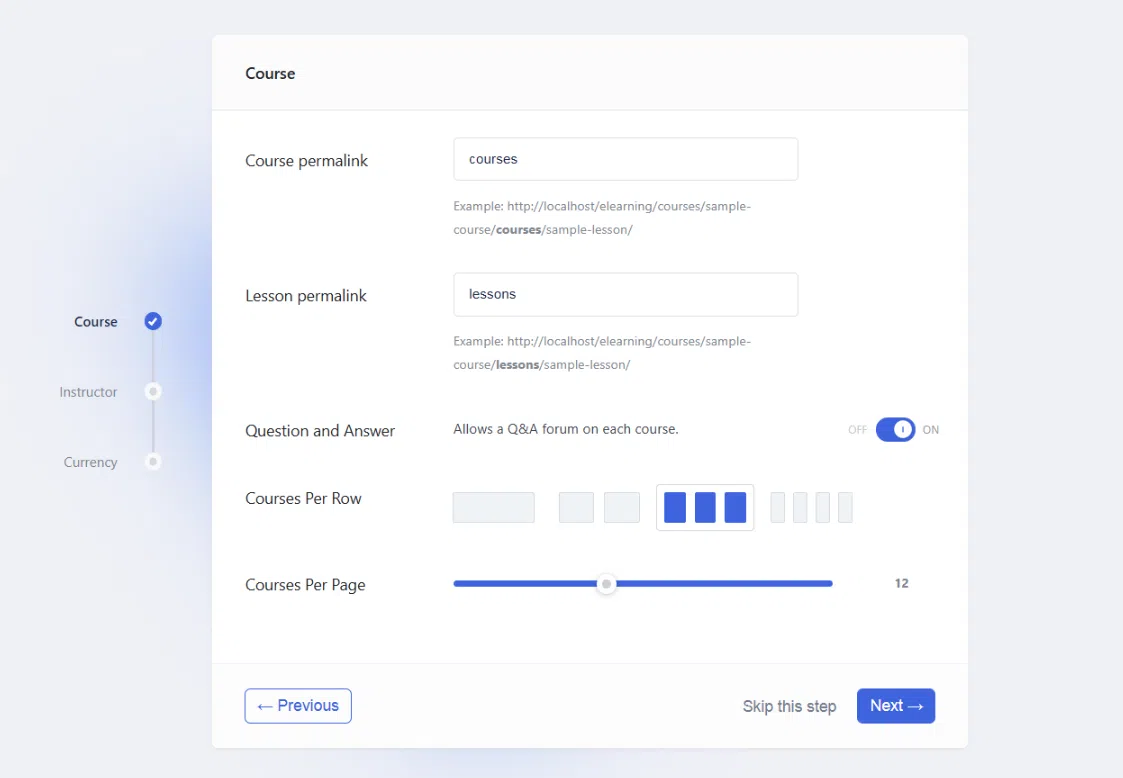
Navigate to Plugins > Add New. In the search bar, type “TutorLMS”. Locate the TutorLMS plugin, click Install Now, then Activate.
Upon activation, a setup wizard will guide you through initial configurations. Follow the prompts to set up essential settings like currency, course permalinks, and instructor roles.
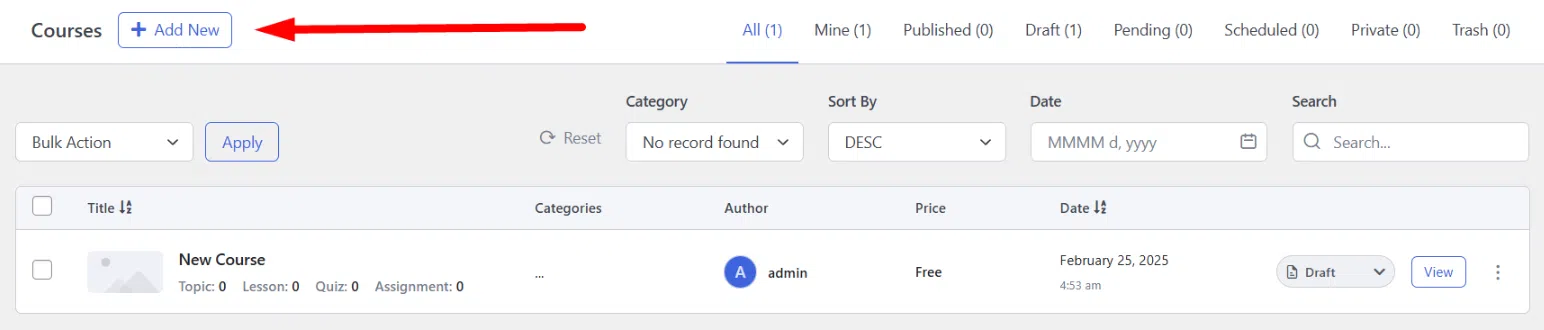
Step 2: Create a New Course
Navigate to Course Creation:
From the dashboard, go to TutorLMS > Courses. Click on Add New to start a new course.
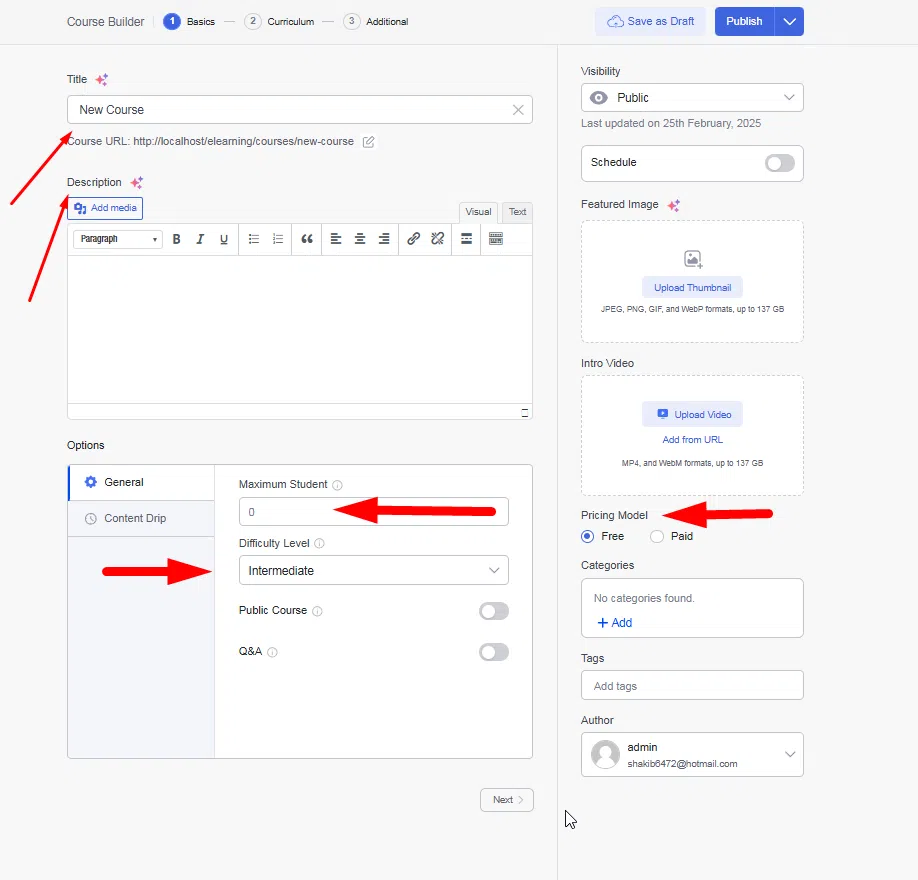
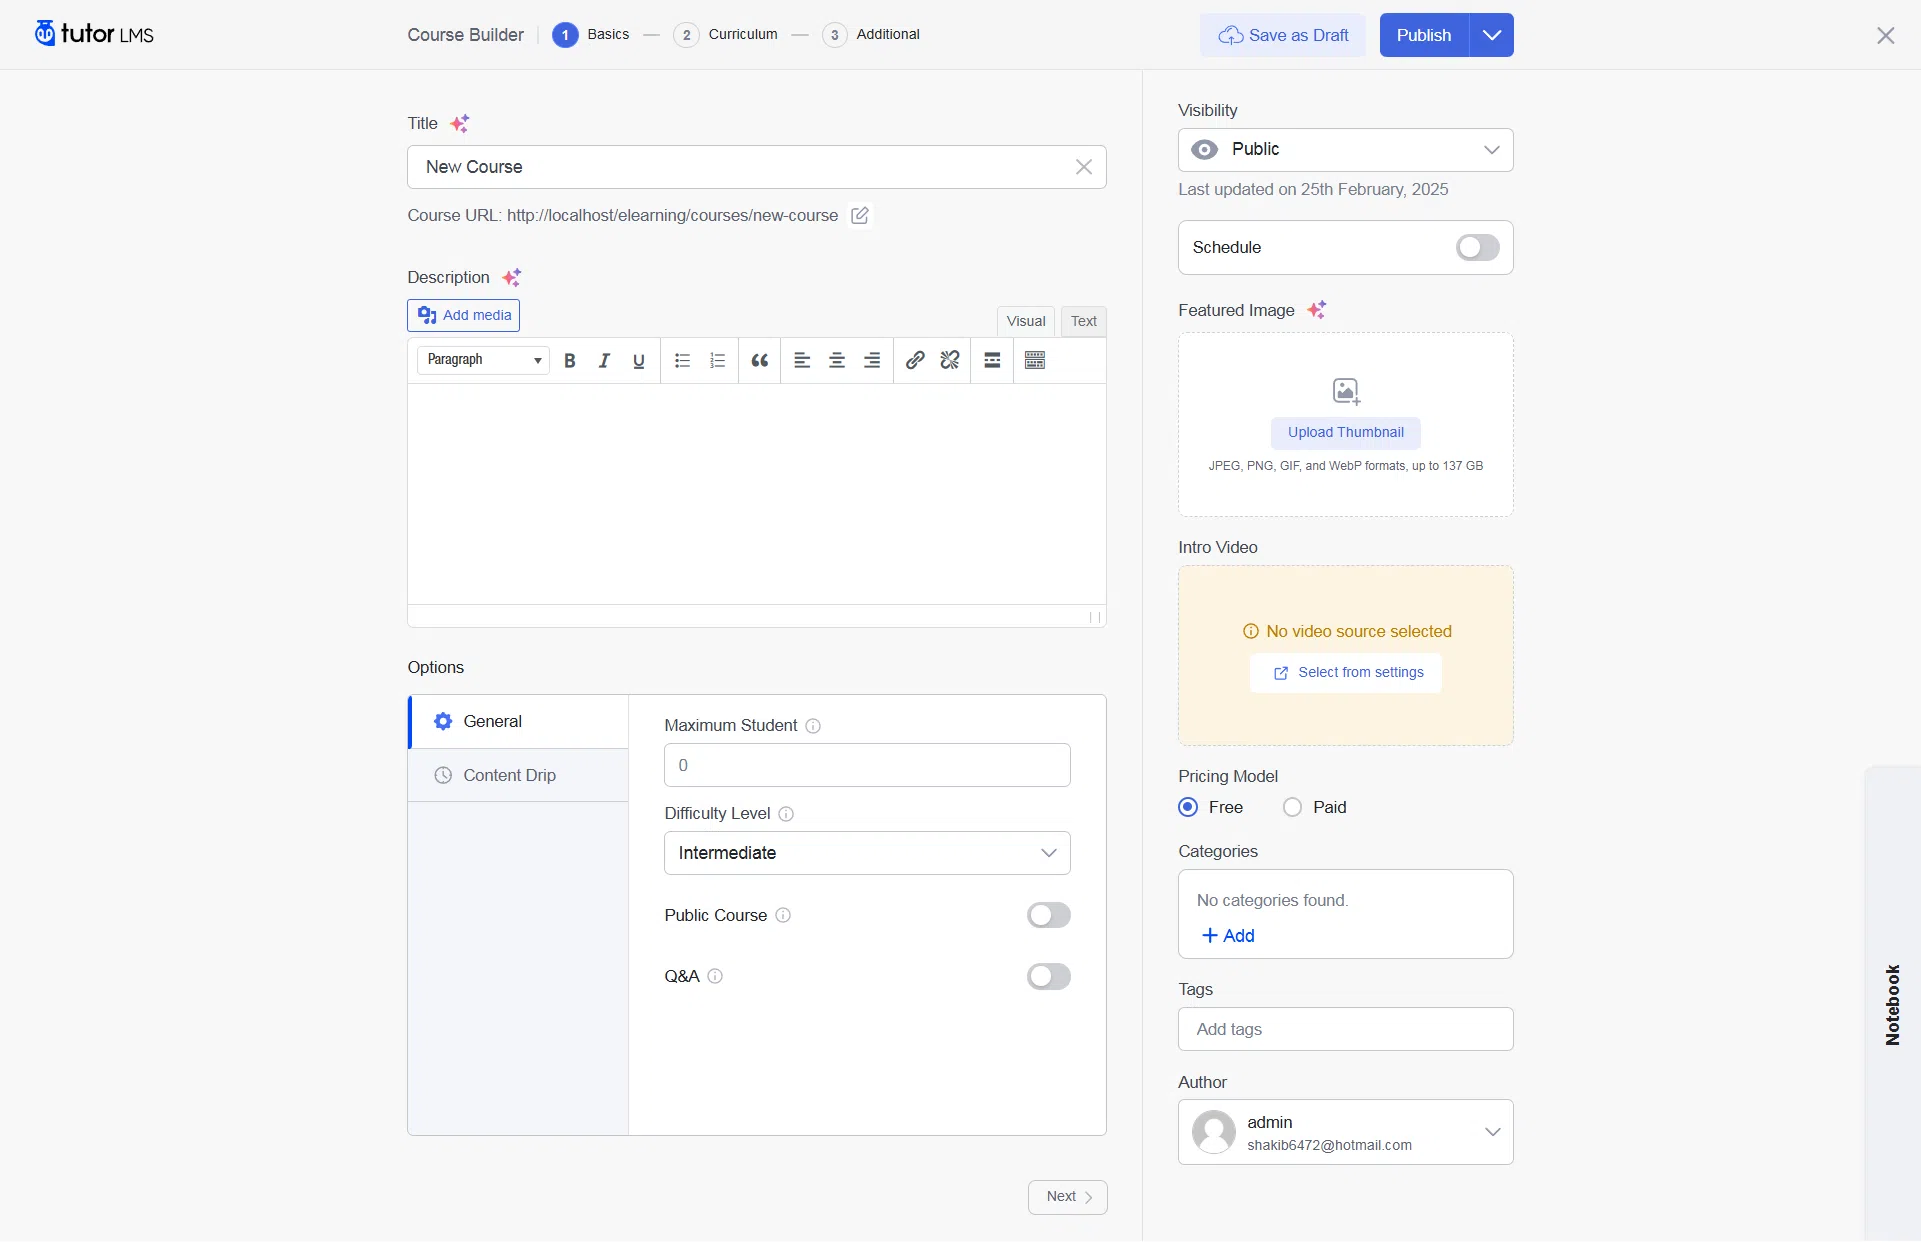
Enter Course Details:
– Provide a clear and concise course title.
– Use the rich text editor to craft an engaging course description. Highlight what students will learn and any prerequisites.
– Add and assign relevant categories and tags to organize your course.
– Upload a feature image that represents your course content.
Define the course difficulty level (Beginner, Intermediate, Advanced). > Set the maximum number of students allowed.
If selling the course, set the price. Ensure WooCommerce is integrated for payment processing or TutorLMS in-built payment processing.
Enable content drip to schedule lesson availability. Configure settings to release content sequentially or on specific dates.
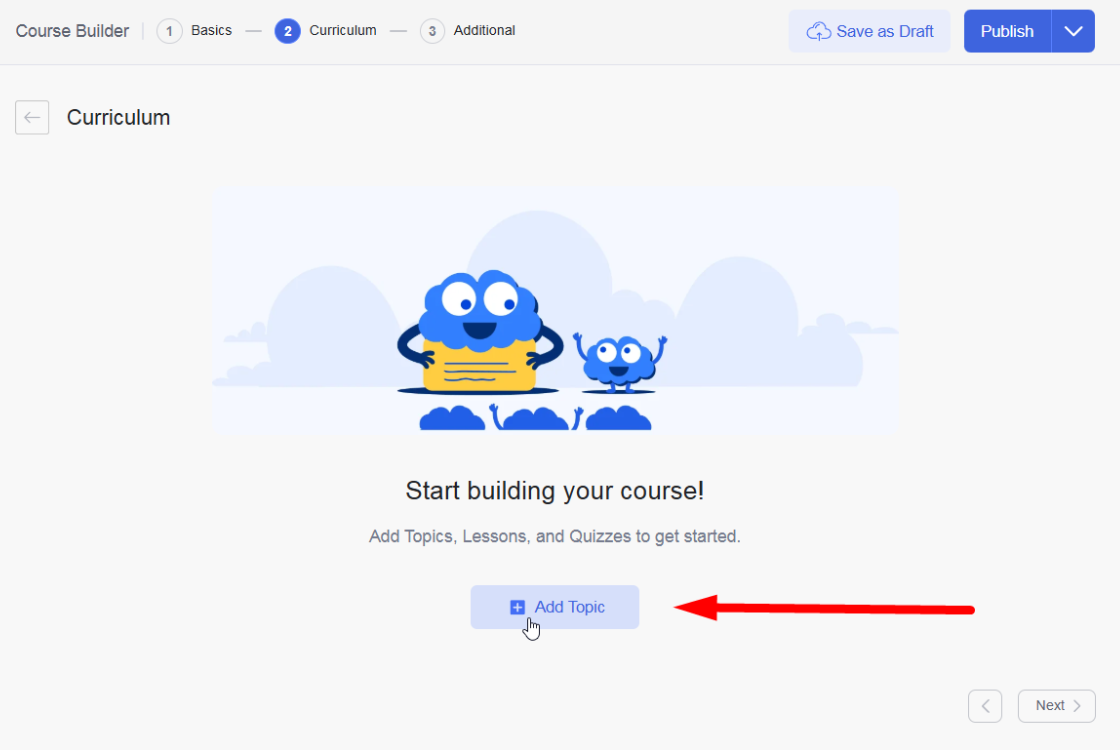
Step 3: Build the Course Structure
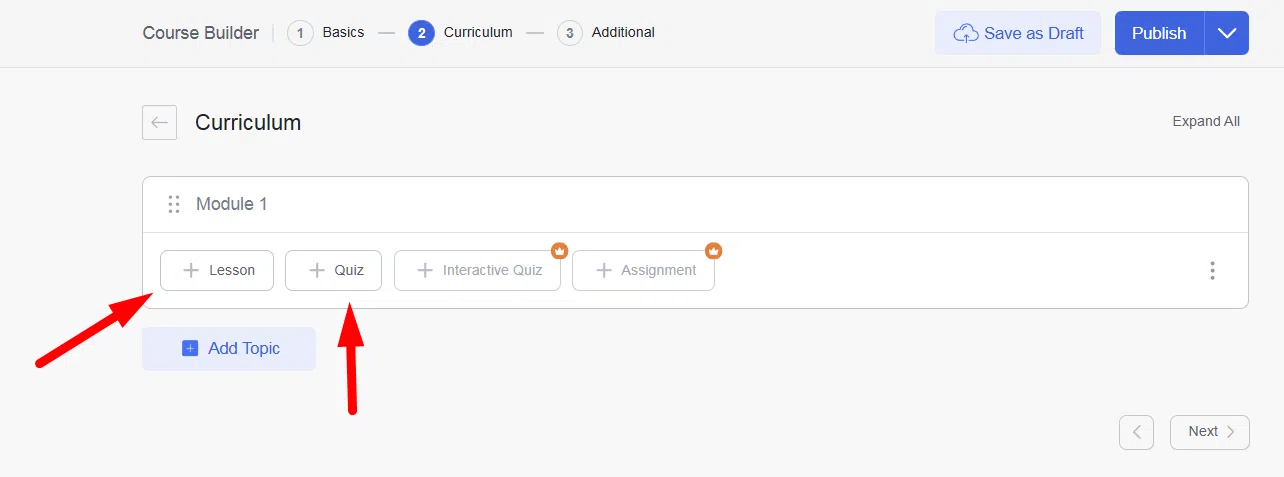
Access the Course Builder: Within the course editor, locate the Course Builder section.
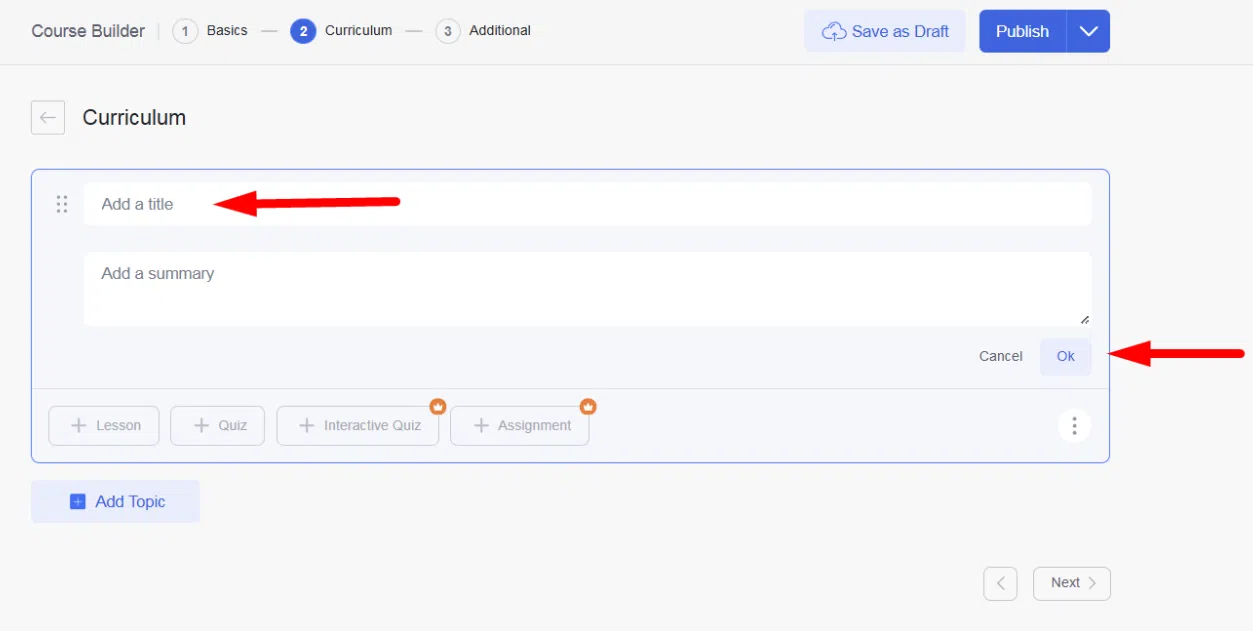
Add Topics and Lessons: Click on Add New Topic to create a module or section.
Add a title and a description (if have any):
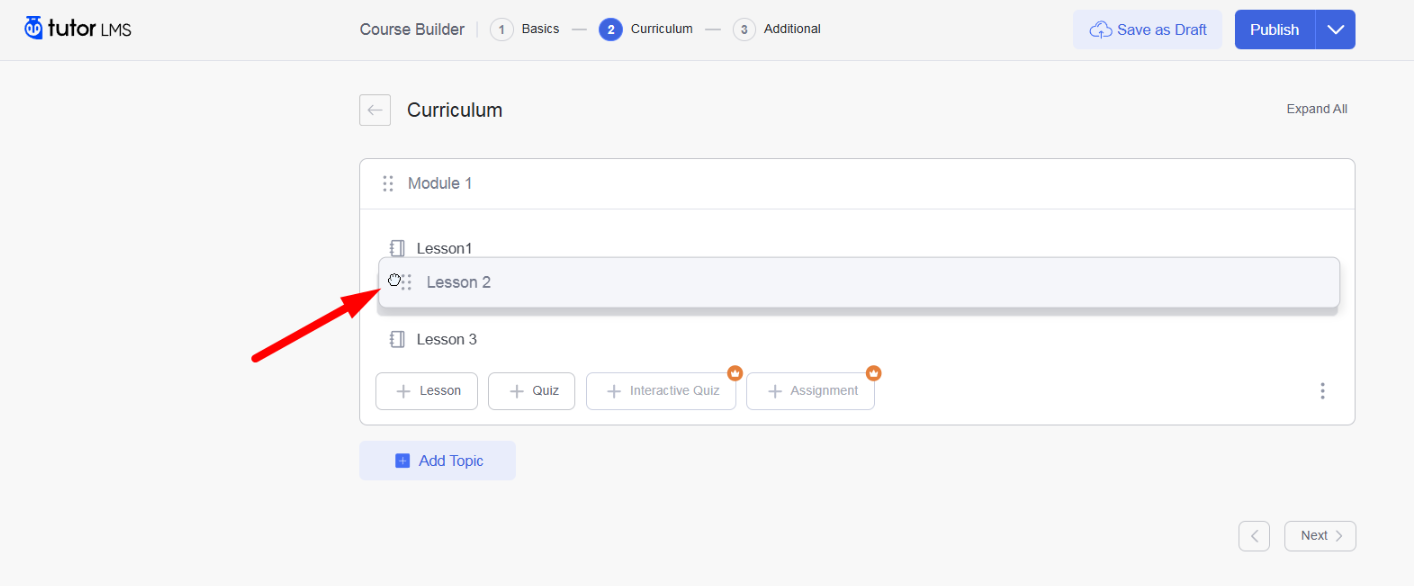
For each topic, add lessons by clicking Add Lesson.
Drag and drop topics and lessons to arrange them in your desired order.
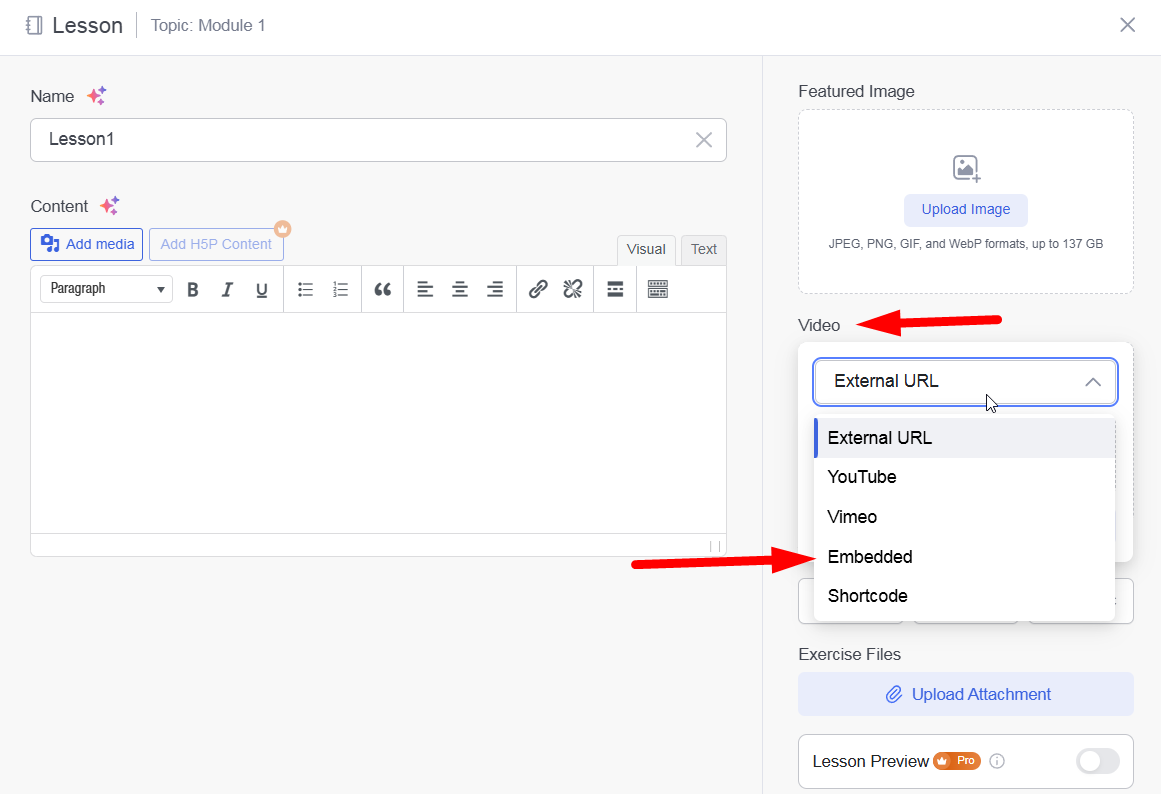
Step 4: Add Lesson Content
Edit Lesson Details: Click on a lesson title to open the lesson editor > Add content using the text editor, including text, images, and other media.
To include videos, you need to define video source first:
Then, use the Add Video button > For platforms like YouTube, paste the embed link directly into the editor.
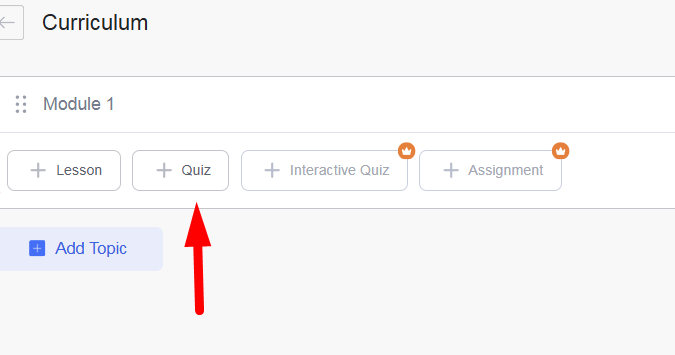
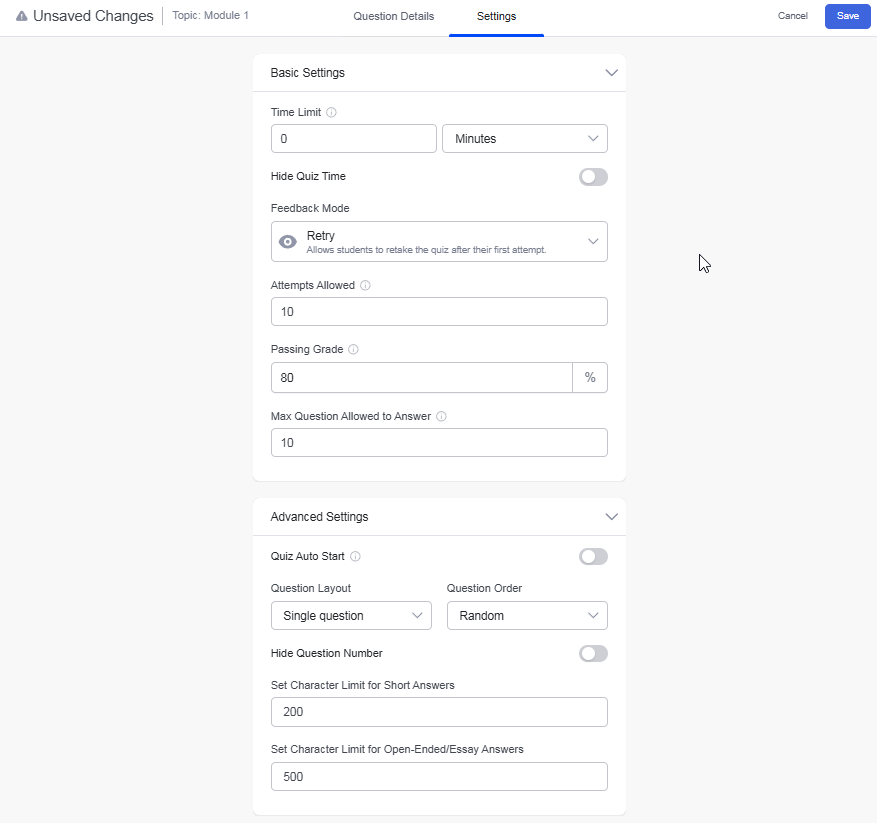
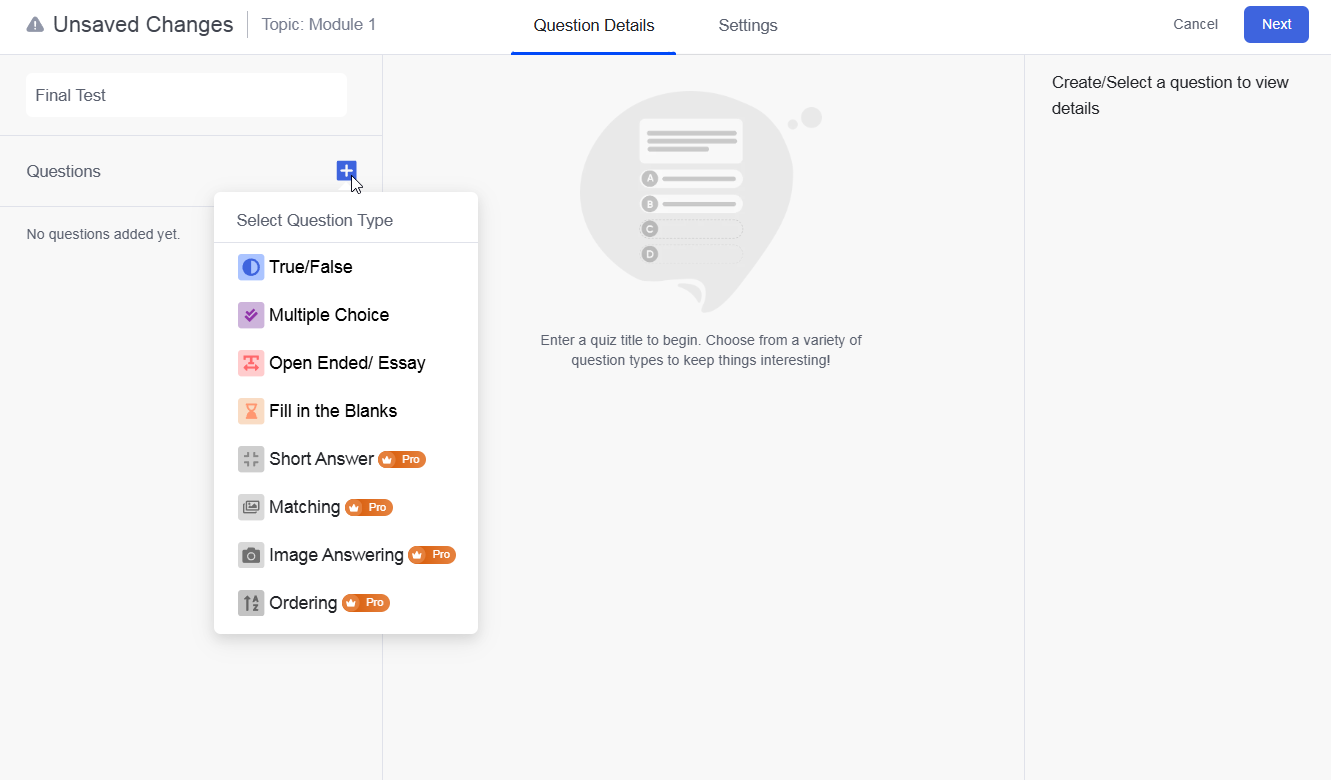
Step 5: Create Quizzes
In the Course Builder, click on Add Quiz under the desired topic.
Set the quiz title.
Determine the passing grade, time limit, and attempt restrictions.
Click on Add Question to input questions. > Choose from various types: multiple-choice, true/false, matching, etc. > Provide correct answers and, if necessary, explanations.
Step 6: Publish and Review
Use the Preview button to see how the course appears to students. Check for content accuracy and layout consistency.
Once satisfied, click Publish to make the course live.
Test the Course: Enroll as a student to experience the course firsthand. Ensure all links, media, and quizzes function correctly.
6. Support and Maintenance
Ongoing support and maintenance are key to keeping your eLearning website running smoothly. Regularly update your LMS and plugins to ensure security and performance, optimize your database to enhance speed, and review course content for accuracy. Monitor and fix broken links, conduct security audits, and ensure your site is mobile-friendly.
Track site performance, schedule regular backups, and optimize user experience across all devices.
Frequently Asked Questions
How to sell eLearning courses online?
To sell eLearning courses online, first, identify your niche and target audience. Develop high-quality content, including videos, quizzes, and resources that provide real value. Choose a platform to host your courses and set a competitive price based on market research.
Marketing is essential to success. Promote your courses through social media, email campaigns, and influencer collaborations. Also, gather testimonials from satisfied students to build credibility and trust.
Why is WordPress the Best Choice for Creating eLearning Websites?
WordPress is an excellent choice for creating eLearning websites because it offers flexibility, scalability, and ease of use. With plugins like TutorLMS, you can quickly set up and manage courses, quizzes, and certifications without needing advanced technical skills. The platform also allows you to customize your site, add integrations, and scale as your user base grows—all at an affordable price.
Additionally, WordPress is SEO-friendly, helping your courses rank higher in search engines and attract organic traffic.
How Much Does It Cost to Create eLearning?
The cost of creating an eLearning website varies depending on your needs and the tools you choose. For a basic WordPress setup with an LMS plugin like TutorLMS, the cost could start around $500–$1000 for initial setup, including hosting, themes, and plugins.
However, if you want custom development, advanced features, or high-end video production, costs could rise to $2,500–$10,000 or more. Ongoing costs include platform maintenance, updates, and marketing expenses.
Conclusion
Building an eLearning website takes planning, effort, and the right tools. A well-structured platform with engaging courses and a smooth user experience keeps students coming back.
Keep improving—update content, optimize performance, and listen to student feedback. The more value you provide, the more your platform grows. Ready to start? Take the first step and build your eLearning business today.